
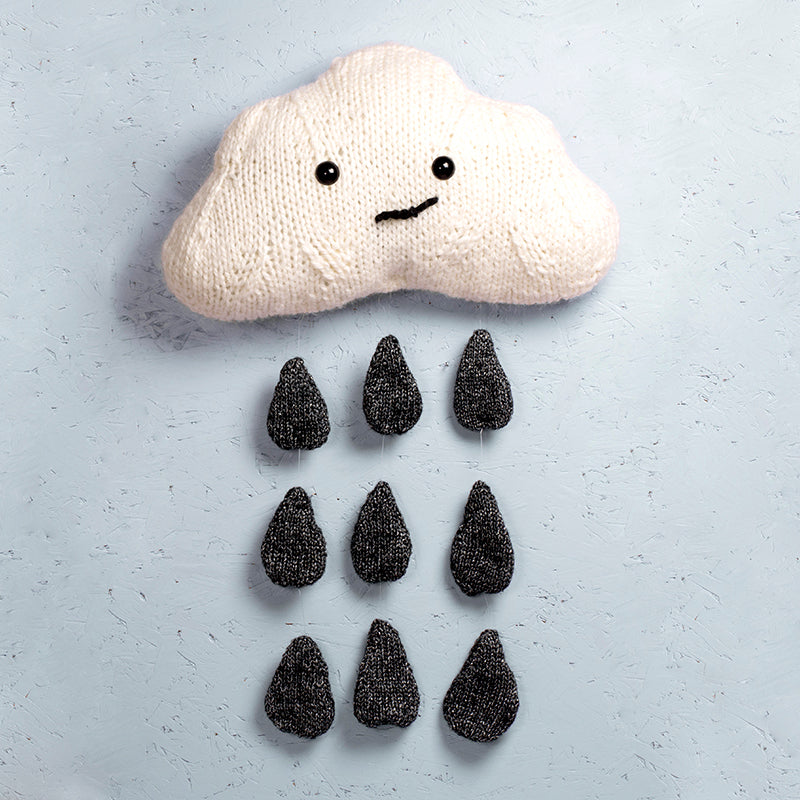
Cloud - Free Knitting Pattern
At the start of the pandemic I designed a rainbow knitting pattern as a big thank you to all the key workers. It was amazing seeing hundreds of rainbows knitted up! When the lockdown started to lift I made a sunshine to join my rainbow, with the idea that even after the darkest day the sun will rise.
My cloud is the third instalment in this series of pandemic knitting patterns. Since lockdown has been lifted, almost everyone I've chatted to has said they've struggled with their mental health or have felt burnt out. I know I certainly have.
I feel I'm working harder than ever, but it's a really tough time to be a small business. On top of that, the anxieties I had before lockdown seem to be amplified now the world is opening back up.
The cloud knitting pattern is free, as I wanted to be available to everyone. I have set up a Just Giving page here though, if you'd like to donate any money towards the mental health charity Mind. My suggested donation is £4, which is what I would usually charge for a knitting pattern.
I also have materials bundles for a chunky or super chunky cloud available here, and 15% from the sales of these kits will be donated to Mind. These include everything you need to knit your cloud, and then you just use the free pattern knit your cloud.
I feel like I've learnt a lot about myself over lockdown, but one of the most important things was that it's okay not to be okay. I'm not one for inspirational memes, but when I saw this tweet by Joy Clarkson it really hit home. It changed my perception of how to look after my mental wellbeing, and that it's okay to have different seasons.

When designing the cloud, I kept this quote in mind. I chose a regular super chunky white yarn for my first cloud, and a metallic black yarn to create the raindrops, and gave it a half smile. It's a reminder to me that there can't be 'good vibes only' all the time, and that's okay. Of course, if you'd like to make a smiley cloud that's absolutely fine too. I made a second chunky cloud using a tweed yarn and knitted rainbow coloured droplets, as a nod to my original rainbow pattern.

YARNS
I designed the cloud in two sizes, chunky and super chunky. Both look amazing, so it's up to you which size you make!
As with most of my patterns you can knit the cloud using the recommended materials below, or you could use something from your stash. Using a different weight of yarn will change the size of the finished cloud. This pattern includes every row, so it can be scaled up or down easily. Below are the recommended materials for knitting a cloud in various weights of yarn.
------------------------------------------------------------------------------------------
SUPER CHUNKY CLOUD 
YARN
- M (main colour - cloud) - White - 2 x 100g balls of Scheepjes Peru - Super Chunky, or you can us any super chunky yarn with the same tension
- C (contrast colour - raindrops) Metallic Black - 1 x 100g of any chunky or aran yarn that can be knitted on 6mm (US 10) knitting needles. This needs to be a lighter weight of yarn than the main colour. I used Rico Fashion Metallisé - Aran.
- Or for the drops you can create rainbow droplets by using nine different chunky yarns of nine different colours. You'll need about 10g of each shade. I recommend using Stylecraft Special Chunky.
OTHER MATERIALS
- 9mm (US 13) straight knitting needles
- 6mm (US 10) straight knitting needles
- Eyes - 2 x 24 mm black toy eyes and washers. Or you could embroider the eyes instead, using some black chunky yarn. If you're making your cloud for a child, always embroider the eyes instead of using toy eyes.
- Some super chunky black yarn, which you'll use to embroider the smile.
- 200g of toy stuffing
- Darning needle for sewing up
- Fishing line or chunky yarn for hanging the droplets from the cloud, you can choose whatever colour of yarn you like. I used fishing line.
- Stitch markers - you will need two stitch markers or a small amount of scrap yarn to mark the stitches. When the pattern asks you to add a SM (stitch marker), either add a stitch marker or tie a small amount of scrap yarn around the stitch that you've just purled to mark it. This will mark where the eyes will be placed when sewing up.
M YARN TENSION: 10 stitches and 14 rows = 10cm x 10cm (4in x 4in) using the Scheepjes Peru Super Chunky yarn on 9mm (US 13) knitting needles.
Please note the tension above is different to that on the ball band of Scheepjes Peru yarn, which is 10 stitches and 17 rows = 10cm x 10cm (4in x 4 in). You need to knit your tension square in M and achieve the tension stated in the above paragraph.
C YARN TENSION: 14 stitches and 20 rows = 10cm x 10cm (4in x 4in) using chunky yarn on 6mm (US 10) knitting needles.
SKILL LEVEL: Easy - Intermediate, for knitters who know the basics.
FINISHED SIZE: The cloud itself measures: 53cm x 25cm x 8cm (21in x 10in x 3 1/2in). Including the raindrops the whole knit measures 71cm x 25cm x 5cm (28in x 10cm x 2in)
------------------------------------------------------------------------------------------
CHUNKY CLOUD 
YARN
- M (main colour - cloud) - White - 1 x 100g balls of chunky yarn. I used a tweed Rico Mega Merino. As an alternative, I recommend Stylecraft Special Chunky.
-
C (contrast colour - raindrops) - 9 x 10g of DK yarn. You can use any DK yarn for the raindrops. I created a rainbow set for my chunky cloud with nine different colours, or you could use 1 ball of DK yarn to create nine drops of the same colour. I recommend Stylecraft Special DK.
OTHER MATERIALS
- 6mm (US 10) straight knitting needles
- 4mm (US 6) straight knitting needles
- Eyes - 2 x 12 mm black toy eyes and washers. Or you could embroider the eyes instead, using some black chunky yarn. If you're making your cloud for a child, always embroider the eyes instead of using toy eyes.
- Some chunky black yarn, which you'll use to embroider the smile.
- 100g of toy stuffing
- Darning needle for sewing up
- Fishing line or chunky yarn for hanging the droplets from the cloud, you can choose whatever colour of yarn you like, I used chunky yellow yarn.
- Stitch markers - you will need two stitch markers or a small amount of scrap yarn to mark the stitches. When the pattern asks you to add a SM (stitch marker), either add a stitch marker or tie a small amount of scrap yarn around the stitch that you've just purled to mark it. This will mark where the eyes will be placed when sewing up.
M YARN TENSION: 14 stitches and 19 or 20 rows = 10cm x 10cm (4in x 4in) using chunky yarn on 6mm (US 10) knitting needles.
C YARN TENSION: Any DK tension, such as 22 stitches and 28 or 30 rows = 10cm x 10cm (4in x 4in) using DK yarn on 4mm (US 6) knitting needles.
SKILL LEVEL: Easy - Intermediate, for knitters who know the basics.
FINISHED SIZE: The cloud itself measures: 36cm x 20cm x 5cm (14in x 4in x 2in). Including the raindrops the whole knit measures 53cm x 20cm x 5cm (21in x 4in x 2in).
------------------------------------------------------------------------------------------
DK CLOUD
I haven't knitted a DK cloud, but these are the materials that you'll need to make one.
YARN
- M (main colour - cloud) - White - 1 x 100g balls of DK yarn. I recommend Stylecraft Special Chunky.
-
C (contrast colour - raindrops) - 9 x 10g of 4ply yarn. You can use any 4ply yarn for the raindrops. I created a rainbow set for my chunky cloud using nine different colours, but you could use 1 ball of 4ply yarn to create nine drops of the same colour.
OTHER MATERIALS
- 4mm (US 6) straight knitting needles
- 3.25mm (US 4) straight knitting needles
- Eyes - 2 x 8mm black toy eyes and washers. Or you could embroider the eyes instead, using some black DK yarn. If you're making your cloud for a child, always embroider the eyes instead of using toy eyes.
- Some chunky DK yarn, which you'll use to embroider the smile.
- 50g of toy stuffing
- Darning needle for sewing up
- Fishing line or chunky yarn for hanging the droplets from the cloud, you can use whatever colour of yarn you like. I recommend using DK yarn.
- Stitch markers - you will need two stitch markers or a small amount of scrap yarn to mark the stitches. When the pattern asks you to add a SM (stitch marker), either add a stitch marker or tie a small amount of scrap yarn around the stitch that you've just purled to mark it. This will mark where the eyes will be placed when sewing up.
M YARN TENSION: Any DK tension, such as 22 stitches x 30 rows = 10cm x 10cm (4in x 4in) using DK yarn on 4mm (US 6) knitting needles.
C YARN TENSION: Any 4ply tension, such as 28 stitches x 36 rows = 10cm x 10cm (4in x 4in) using 4ply yarn on 3.25mm (US 4) knitting needles.
SKILL LEVEL: Easy - Intermediate, for knitters who know the basics.
FINISHED SIZE: If you make a DK cloud please get in touch with it's finished size, and I'll include it in this section. You can email us at hello@sincerelylouise.co.uk
------------------------------------------------------------------------------------------
ABBREVIATIONS
K Knit
Kfb Knit into the front, back and front again of the same stitch, increasing from one to two stitches
K2tog Knit two stitches together, decreasing from two stitches to one stitch
K3tog Knit three stitches together, decreasing from three stitches to one stitch
P Purl
SKP Slip a stitch, knit a stitch, pass the slipped stitch over. Decreasing from two stitches to one stitch
Sts Stitches
SM Stitch Marker / SMs Stitch Markers
* Repeat the instructions within the asterisk
------------------------------------------------------------------------------------------
PATTERN
Cloud - Make two of these pieces.
Cast on 40 stitches in M using the larger knitting needles.
Row 1 K
Row 2 P all even rows unless otherwise stated. Even rows with additional instructions have been underlined.
Row 3 K
Row 5 K1, Kfb, K1, Kfb, K31, Kfb, K1, Kfb, K2 (44 sts)
Row 7 K1, Kfb, K1, Kfb, K35, Kfb, K1, Kfb, K2 (48 sts)
Row 9 K1, Kfb, K1, Kfb, K39, Kfb, K1, Kfb, K2 (52 sts)
Row 11 K9, Kfb, K1, SKP, K6, K2tog, Kfb, K7, Kfb, K1, SKP, K6, K2tog, Kfb, K10 (52 sts)
Row 13 K10, Kfb, K1, SKP, K4, K2tog, Kfb, K9, Kfb, K1, SKP, K4, K2tog, Kfb, K11 (52 sts)
Row 15 K
Row 17 K2, SKP, K3, SKP, K34, K2tog, K3, K2tog, K2 (48 sts)
Row 19 K2, SKP, K2, SKP, K32, K2tog, K2, K2tog, K2 (44 sts)
Row 21 K2, SKP, K1, SKP, K30, K2tog, K1, K2tog, K2 (40 sts)
Row 23 K2, SKP, SKP, K28 [adding SMs to the 9th and 20th of these 28 stitches, these will mark the eyes], K2tog, K2tog, K2 (36 sts)
Row 25 K2, SKP, K5, Kfb, K1, K2tog, Kfb, K7, Kfb, K1, SKP, Kfb, K6, K2tog, K2 (36 sts)
Row 27 K1, Kfb, K1, Kfb, K4, Kfb, K1, K2tog, K12, SKP, Kfb, K4, Kfb, K1, Kfb, K2 (40 sts)
Row 29 K12, K2tog, Kfb, K9, Kfb, K1, SKP, K12 (40 sts)
Row 31 K1, SKP, K8, K2tog, K14, SKP, K8, K2tog, K1 (36 sts)
Row 33 K1, SKP, K1, SKP, K2tog, K1, K2tog, K14, SKP, K1, SKP, K2tog, K1, K2tog, K1 (28 sts)
Row 35 Cast off 6 stitches, K to the end of the row (22 sts)
Row 36 Cast off 6 stitches purlwise, P to the end of the row (16 sts)
Row 37 K1, SKP, K10, K2tog, K1 (14 sts)
Row 39 K
Row 41 K1, SKP, K8, K2tog, K1 (12 sts)
Row 43 Cast off.
RAINDROPS - Make nine of these pieces in C. If making rainbow drops make one raindrop in each shade.
Cast on 5 stitches in C using the smaller knitting needles.
Row 1 K
Row 2 P all even rows
Row 3 K1, Kfb, Kfb, K2 (7 sts)
Row 5 K1, *Kfb* four times, K2 (11 sts)
Row 7 K1, Kfb, K6, Kfb, K2 (13 sts)
Row 9 K
Row 11 K
Row 13 K
Row 15 K1, SKP, K7, K2tog, K1 (11 sts)
Row 17 K
Row 19 K1, SKP, K5, K2tog, K1 (9 sts)
Row 21 K
Row 23 K1, SKP, K3, K2tog, K1 (7 sts)
Row 25 K1, SKP, K1, K2tog, K1 (5 sts)
Row 27 K
Row 29 K
Row 31 K1, Kfb, Kfb, K2 (7 sts)
Row 33 K1, *Kfb, K2* twice (9 sts)
Row 35 K
Row 37 K1, Kfb, K4, Kfb, K2 (11 sts)
Row 39 K
Row 41 K1, Kfb, K6, Kfb, K2 (13 sts)
Row 43 K
Row 45 K
Row 47 K
Row 49 K1, SKP, K7, K2tog, K1 (11 sts)
Row 51 K1, SKP, SKP, K1, K2tog, K2tog, K1 (7 sts)
Row 53 K1, SKP, K1, K2tog, K1 (5 sts)
Row 55 Cast off, leaving a 40cm (16in) tail for sewing up.
------------------------------------------------------------------------------------------

1. Fold a raindrop in half, so the cast on and cast off edges meet and the wrong sides face each other.

2. Sew the cast on and off edges together using horizontal mattress stitch with the cast off tail. I'm using a contrasting green colour so you can see what I'm doing.
3. Sew up one side of the raindrop using regular mattress stitch with the same piece of yarn. Sew to the fold and push the needle and yarn through the raindrop and weave it into the inside seam.

4. Before sewing up the other side of the raindrop you need to add the yarn or fishing line for the raindrops to hang from the cloud on. Cut a piece yarn or fishing line that measures 50cm (20in) for the super chunky cloud, 40cm (16in) for the chunky cloud or 30cm (12in) for the DK cloud. I'm using a chunky yellow yarn to demonstrate this. Thread the yarn or fishing line though a needle and then secure the end of it to the inside of the cast on/off edge seam. You can do this by tying the piece of yarn or fishing line and it's tail together.

5. Sew through the raindrop, push the needle and yarn or fishing line out of the centre of the fold of the raindrop. Don't pull the yarn or fishing line too tightly, as if you do it will gather the raindrop.
6. Sew up the other side of the raindrop using mattress stitch in a new piece of C yarn. Once again I'm using a contrasting green yarn to show what I'm doing. Push the needle and yarn in and out of the knit a couple of times, and then trim the yarn and weave in the loose end. Repeat steps 1-3 for two more of the raindrops, sewing up the cast on and cast off edges and one side of the raindrop.

7. Take the second raindrop and place it above the first. Using the long piece of yarn/fishing line that the raindrops will be hung from, sew through the centre of the cast on/off seam of the second raindrop and secure the yarn by sewing into the inside seam a couple of times. This will stop the raindrop from slipping down the yarn. When doing this leave a gap of yarn/fishing line between the two raindrops. approximately 7cm (3in) for the super chunky colour, 5cm (2in) for the chunky cloud or 3cm (1in) for the DK cloud,

8. Repeat Step 5, pushing the needle and yarn/fishing line out of the centre of the fold of the raindrop. Then, like in Step 5, sew up the side of the raindrop using regular mattress stitch.
9. Repeat Steps 7-8 for the third raindrop, placing it above the second one. Do not trim any excess yarn/fishing line as you'll use it for sewing up later. Repeat Steps 1-9 twice more with the other raindrops, so you'll have three lines of raindrops in total. 
10. Place the two cloud pieces together so that the cast on edges meet and the right sides are facing up. Pin the cast on edges together. 

11. Sew the cast on edges together using horizontal mattress stitch in M. I'm using a contrasting orange yarn so you can see what I'm doing. You can also use backstitch to sew up the cloud, but you'll need to turn the cloud inside out and sew the cast on edges together using backstitch. You can use backstitch to sew up the rest of the cloud, but follow the steps below as stated. Don't sew it all up just yet!
12. Before sewing up the rest of the cloud you're going to add the raindrops. Take the lines of raindrops and place them evenly along the cast on edge seam. Sew each excess piece of yarn/fishing line through the cast on edge seam. 
13. On the inside of the piece, sew the yarn/fishing line into the seam several times. This will secure it in place. 

14. Sew up the side of the cloud using regular mattress stitch, using the same piece of M yarn that you used to sew the cast on edges together. Once again I'm using a contrasting orange yarn so you can see what I'm doing. Sew up to where you started casting off when knitting the cloud.

15. Sew up the first cast off pieces of the cloud using horizontal mattress stitch, then sew up the sides using regular mattress stitch. Sew the second cast off edges together using horizontal mattress stitch, followed by the next side using regular mattress stitch. Finally sew up the cast off edges together using regular mattress stitch.
16. Sew up the other side of the cloud using regular mattress stitch but leave a hole for stuffing.
17. Place the toy eyes over the SMs. If you'd like to change your cloud's expression you can move the eyes around. The markers are there to guide where my preferred eye placement is. If making your cloud for a child, embroider the eyes instead using some black yarn.
18. Secure the toy eyes with washers on the wrong side of the cloud. Turn the cloud so the right side is facing you and carefully remove the SMs. 
19. Cut a piece of black yarn that's the same weight as the M yarn used for knitting the cloud. Thread it through a darning needle and then push it through the cloud from the wrong side, as shown above. Leave a tail of the yarn inside the piece.
20. Sew a line with the yarn. I sewed mine slightly diagonally, so the line was slightly wonky. You can sew a straight line if you'd like, which will make the cloud more smiley.

21. Secure the line by adding a stitch in the centre of it. Then tie the black yarn and it's tail together on the wrong side of the piece and trim any excess black yarn.

22. Stuff the cloud using the toy stuffing. Follow the shape of the cloud when stuffing it, but be carefully not to over stuff it. While stuffing I like to press the cloud down with my hands to keep the shape flat. 
23. To hang your cloud up you can use a little piece of yarn or fishing line. Thread the yarn/fishing line through the top of the cloud and tie it together using a secure knot. Then hang your cloud on a nail on the wall, making sure it's out of reach of children.
Thank you for my making my cloud knitting pattern. I hope you enjoyed knitting it! You can share you photos with me on Instagram @sincerelylouise. I'd love to see your finished knits ☁️
Leave a comment
Comments will be approved before showing up.